Powered by Blogger.

Indian-Style Apricot Chicken

>> Sunday, July 1, 2012

I found this particular recipe in a cookbook I picked up along the way called Incredibly Easy Gluten-Free Recipes.

(Image Courtesy of Amazon)

Indian-Style Apricot Chicken is both incredibly easy (made in a crockpot) and free of most allergens.  And amazingly delicious.

Ingredients:
6 Chicken Thighs (we only had four and it worked perfectly, with extra juice)
1/4 teaspoon salt
1/4 teaspoon black pepper
1 Tablespoon vegetable oil
1 large onion, chopped
2 Tablespoons grated fresh ginger
2 cloves garlic, minced
1/2 teaspoon ground cinnamon
1/8 teaspoon allspice (you can make your own using equal parts ground cloves, nutmeg, and cinnamon)
1 can (14.5 oz) diced tomatoes, undrained
1 cup chicken broth
1 package (8 oz) dried apricots
1 pinch saffron threads (optional - and I didn't use because I didn't have any)
Hot basmati rice
2 Tablespoons chopped fresh parsley (optional, and again left out)

Slow Cooker Directions:
1.  Coat slow cooker with nonstick cooking spray. Season chicken with salt and pepper.  Heat oil in large skillet over medium-high heat; brown chicken on all sides.  Transfer to slow cooker.

2.  Add onion to skillet.  Cook and stir 3-5 minutes or until translucent.  Stir in ginger, garlic, cinnamon, and allspice.  Cook and stir 15 to 30 seconds or until mixture is fragrant.  Add tomatoes with juice and broth.  Cook 2-3 minutes or until mixture is heated through.  Pour into slow cooker.

3.  Add apricots and saffron, if desired.  Cover; cook on LOW 5-6 hours or on HIGH 3-3.5 hours or until chicken is tender.  Serve with basmati rice and garnish with parsley.

Makes 4-6 servings.


I should have taken a photo of my plate but I was starving and it was so delicious that I completely forgot.  You will probably need to season further with salt, depending on your palate.  I found that the apricots sweetened the dish nicely, while the tomatoes provided an acidic balance.

Enjoy!

Read more...

Deodorant Recipe #2

>> Tuesday, May 22, 2012

This particular recipe was inspired by this post at One Good Thing by Jillee.  Her natural deodorant was the basis for my experimentation.

Basically starting out I followed her recipe:

2-3 TBSP Coconut oil (melted in the microwave for a few seconds)
1/8 C Cornstarch
1/8 C Baking Soda
10 drops Tea Tree Oil

I soon found it to be a very runny consistency so I added another 1/8 C each of baking soda and cornstarch.

And I must admit that my tea tree oil is in a very large bottle and sort of dumped into my mixture, rather than dropped.  The lavender was drowned out completely by the tea tree smell.  Which is very much like a disinfectant odor, not an "I smell lovely" odor.  Hmm...

I tried that concoction for a few hours, but I found that it balled up under my armpits and kind of got all over everything.

I wondered what would happen if I added beeswax to make it solid.  So I did.  But then I got a bit carried away with experimenting.

What I recommend doing is this:
Mix these ingredients together:
   - 3 TBSP liquid coconut oil (remember to melt for a just a few seconds in the microwave)
   - 1/4 C + 2 rounded TBSP Cornstarch
   - 1/4 C + 1 rounded TBSP Baking Soda
   - 10 drops of Tea Tree Oil
   - A few drops of Lavender (or Vanilla or Sweet Orange)


In a double boiler, gently melt (DO NOT BOIL THE OIL): 
   - 3 rounded TBSP of Beeswax
   - 1 TBSP Coconut Oil

Add in the liquid-ish Baking Soda/Cornstarch concoction and stir until well mixed.  Dribble a bit in the bottom of clean deodorant containers (ones that have a base that can push up the deodorant) to seal the bottom.  Once that is cool, fill containers and let cool completely before capping.  You should have enough to fill two regular Secret sized deodorant containers, more or less.

And that my friends, is probably where I should have stopped.

But I didn't.  

Instead I did all of the above.  And then in a moment of sheer madness, I added the following:
- 1 & 1/2 TBSP Cocoa Butter

It took me about another hour or two to figure out what I had to add to even out the Cocoa Butter.

That meant I had to add:
- 1/2 TBSP Baking Soda
- 1 TBSP Cornstarch
- 1 & 1/2 TBSP Coconut Oil
- More Lavender
- 2+ TBSP Beeswax

And while I have really good deodorant in the sense that it can really block the smell of body odor the whole day and part of the next - a pretty big miracle in my book, the tea tree oil got toned down, and it blocks a lot of moisture, I really don't care for the smell overall.    

It's not bad because it's not uber strong or that noticeable, but tea tree oil and cocoa butter (that smells like chocolate, let me remind you) is not how I want to walk around town smelling.  In fact, while cocoa butter may be great for me, I can't get over the chocolate fragrance.  It drowns out a lot of other fragrances and does not mix well fragrance-wise with anything other than vanilla (or sweet orange if you feel like smelling like one of those orange chocolate balls that you buy at Christmas and smack on a table, breaking it into chocolate in the shape of orange slices).  I can't imagine wanting to smell like chocolate.  Ever.  Fruit? Love it.  Flowers? Ok.  Chocolate?  Never.

Thankfully it's subtle in the amounts I apply so *I don't think* I walk around smelling like disinfected chocolate, but I definitely am not going to repeat this recipe again with cocoa butter.

To remedy the smell situation, I did buy shea butter in solid form on Amazon.  I have no idea what it smells like or how it will affect the overall turn out of the recipe, but according to a lot of recipes I've seen for lotions and such, it's pretty interchangeable with cocoa butter.

In the meantime I am using what I made.  I really like that while it may not keep me perfectly dry in Florida heat and humidity (neither did prescription strength Secret or Dove, btw), it does keep me body-funk-odorless.  And I only have to apply it one time a day, although I did make a small travel size for my purse just in case.  If you apply to much, it will ball up under your arms, so just be aware of that.

What I really want to do next time is just try the recipe I concocted before I added the cocoa butter and see if that is enough.  I can always melt it all down again, add the shea and other ingredients, and see what happens.  But once you add something, there is no going back with that batch.

I hope soon to get to some makeup reviews that I've been dying to do now for a while.  I've discovered 3 new brands that are quite lovely.  I also made solid lotion bars that smell like orange chocolate, and would smell better as shea vanilla, I'm convinced.  Hopefully I'll get a chance to write about both of those topics soon.  Stay tuned!

Read more...

My Momma's Granola

When we lived in Africa, my mother always made granola for our breakfasts.  For much of my life I took it for granted and would look forward to having toast or pancakes, which were our special treat on Saturdays.  Occasionally we would buy some British variety of packaged cereals like corn flakes or rice crisps, but I preferred granola over those, even if we did have problems with infestations of weevils in our oats.

Now as a grown up, I miss my mom's granola.  There is no store bought brand that can live up to it, no matter how hard they try.  And now that I can't eat gluten, I don't bother to buy cereal except for splurging a couple of times a year on Fruity Pebbles, which happen to be gluten free.

Without further ado, here is my mom's pure, unadulterated best ever granola recipe:
1. Preheat oven to 250 degrees F
2. In a large mixing bowl, measure 10 cups of oats (I use Bob's Red Mill Gluten Free variety)
3. Add the following ingredients in a blender and blend until well mixed
    - 1/2 C water
    - 1 C oil (I use light olive but you can use whatever oil you want)
    - 1 C brown sugar
    - 2 tsp Vanilla
    - 1 to 1&1/2 tsp Salt

4. Pour the blended concoction over the oats and stir until thoroughly mixed.
5. Lightly grease two cookie sheets
6. Spread the oat mix over the two cookie sheets and bake for 1 hour
7. Don't forget to lick the bowl!!

I like to let the granola sit in the oven and let it all cool down together, after I retrieve a bowlful for myself to snack on.  That makes the granola drier and crunchier.

Once it's all cooled down, break it up and put it in an air tight container.  I don't know how long it stays good for because I always eat mine before it has a chance to go stale.

Variations:
I like to add flax seed, ground flax flour and pecans to mine.  For the one I make, I used only 8 cups of oats, and added 1/3 C flax seeds, 2/3 C flax flour, and 1 heaping C of chopped pecans.

You could try adding coconut, almonds, or other add-ins.  Just make sure to adjust the amount of oats up or down accordingly.

I wish I had pictures of my yummy batch of breakfast goodness, but alas, one camera has sand in it and I could not figure out where I had hidden the other one from Z.  

Read more...

Strawberry Freezer Jam Recipe

>> Tuesday, May 8, 2012

My poor neglected little blog.

I've decided I'm going to post my crafting, cooking, making, DIY stuff here, even if my projects aren't necessarily directly related to clean living.  Until I made that decision, I didn't know where to post my stuff, so I wasn't posting it.  That should increase my activity over here, too, so this blog isn't so badly ignored by me.

On to the recipe for strawberry freezer jam.

I used Ball RealFruit Instant Pectin and got the recipe from under the label.

Image courtesy of here

Recipe:
1 2/3 C prepared fruit
2/3 C sugar
2 TBSP Ball RealFruit Instant Pectin
(do not exceed more than 6 1/2-pint jars per recipe or jam won't set properly)

1.  Prepare the strawberries by washing & cutting off the tops (called "hulling"), and then slicing them.  Mash them one layer at a time using a potato masher.

FYI, don't bother dicing the strawberries.  If you make the pieces too small, you can't mash them very effectively with the potato masher.

I started with a little less than 4 lbs of strawberries.  Z had eat some for breakfast, and some had gone bad.  My strawberries were really, really ripe, and I thought that might affect the outcome, but it didn't.

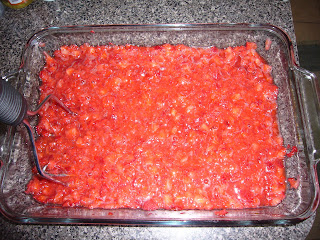
Here's my prepared fruit that I mashed up in a glass cake pan.  If you want smooth no-chunk jam, then I would recommend putting the fruit through a food processor, or something similar.  My strawberries, no matter how much I mashed them, stayed somewhat chunky. 


2. Mix sugar and pectin in a separate bowl.  

I measured my mashed strawberries and had enough to double the recipe.  Make sure you adjust the sugar and pectin up or down per the amount of prepared strawberries.

3.  Add fruit to the pectin/sugar mixture, and stir for 3 minutes.


 4. Ladle fruit mixture into clean jars and let stand for 30 minutes.  Make sure you leave 1/2 inch of headspace at the top of the jar so the jam has room to expand when freezing.

5.  Put lids on the jars, put a jar in the fridge for immediate consumption, and put the rest in the freezer.  Keep for up to one year in the freezer, or one month in the fridge.

My batch of 3 1/3 cups of jam made for 6 full half pint jars.  Remember this was a doubled recipe.


I can't believe how easy it was to make jam!  And so yummy, too!  My jam tasted like the fresh strawberries that are used in strawberry shortcake.  Delish!  I'm definitely going to try this with other fruit like blueberries.

Read more...

Deodorant Recipe #1

>> Wednesday, April 25, 2012

I finally got it together enough to post about my first adventure in making deodorant.  With pictures no less.  :)

I used the recipe in Making It.

Step 1:
I cleaned out my old deodorant dispenser - I only had one, a Dove deodorant that did not have a base that moved up, but instead a twisting center rod.  

I took out the remaining dove deodorant, wiped it out as best as I could, then rinsed it several times with plain vinegar, wiping it out in between each rinse.  That seemed to clean it well.  The directions said not to wash with soap and hot water because vinegar cleans much better, so that's what I did.

Step 2: 
I got all of my ingredients together.  
- 4 TBSP of Extra Virgin Olive Oil
- 1/8 tsp of Tea Tree Oil
- 1/8 tsp of Rosemary Essential Oil
- 1/8 tsp of Lavender Essential Oil


Step 3: 
I made my own double boiler using a stainless steel bowl that fit inside a regular sauce pot.  I put water in the sauce pot and brought it up to a simmer, then plopped my bowl in that.


Step 4:
Add the 4 TBSP of Olive Oil and heat up

Step 5:
Add the 1 TBSP of Beeswax pastilles to the hot olive oil


Step 6: 
Stir the beeswax and olive oil until all the pastilles are melted.


Step 7:
Remove the sauce pan from heat and add in the essential oils (keeping the bowl in the sauce pan so that the oil stays hot).  Rosemary and Tea Tree oil act as bacterial killers and the Lavender is to make it smell good, but you could probably use any essential oil you like to scent the deodorant.

Step 8: 
Pour a tsp or so into the bottom of the dispenser to seal it.  Let it cool for a few minutes.


Step 9:  
Pour the rest of the concoction into the dispenser and let cool fully before trying to use it.


Results:

1.  I used the wrong type of dispenser.  If you are going to make this recipe, you have to have a container that has a base that will push the deodorant up.  Just having a twisting center rod isn't going to work because the mixture, even when fully cooled is too soft to twist up.  The rod just turns in place.  I was disappointed by this discovery.  I ended up having to scoop out the soft solid with my finger and applying it that way.  I could remedy the situation by going to the dollar store, buying a cheap deodorant that was the correct type of dispenser, cleaning it, scooping out the oil/beeswax mixture, remelting it and then putting it in the new dispenser.

2.  But I'm probably not going to do that because after a few days of using it, I found that this deodorant does not work particularly well.  It's very easy to make, and smells good, but it does not help very long with body odor.  In fact, it does a poor job at this.  I felt stinky by evening even after applying it several times throughout the course of the day.  Maybe I'm a super stinky person, and different users may have different results.  But for me, it doesn't work.  Bummer.

3.  I did find it made my underarms very very soft.   If I applied it in conjunction with my no-smell Crystal deodorant, the two of them together worked well.  But if you are making your own deodorant so that you don't have to buy any, this probably isn't going to solve that.  I may buy a diffuser and use what I've got as air freshener.  Or use it in conjunction with my store bought deodorant to give me a little scent.

I would say overall that this experience was fun, the recipe was super easy and fast to make, and the concoction smelled divinely herby, but it failed to give me the results I was looking for in a deodorant.

I do have another DIY deodorant recipe emailed to me that I am going to try next, so stay tuned.

Read more...

In the Meantime

>> Friday, April 20, 2012

I'm still waiting for a few things like cocoa butter and tea tree oil to get here before I can start making my deodorant and such.

In the meantime, I've had a lot of fun poking around the interwebs where I stumbled upon this beauty.  If you are into storing your own foods, this blog has an extensive list of recipes and how-to's that make jarring food look fun and actually doable.  I added their link to Clean Food on the side.

Speaking of clean food and cooking, checkout this website recommended to me by several friends.  It's also listed under Clean Food on the side bar.  

Read more...

Back!

>> Monday, April 16, 2012

Ok, I'm back home after 9 days of lovely vacation, and I have a huge make-it list for this month.

Stay tuned for:
- baby wipes
- lip balm
- deodorant
- stain remover
- etc

...just to name a few.

Supplies should be delivered this week while I get myself organized.

I am going to try to take photos of the process and post each one as I make it.  I am in the market for a new camera after mine died on vacation at the beach.  I have a crappy old 2006 backup that I can use until I find a replacement.

I also will make a page of links to make-it posts, as well as links to the original inspirations where possible.

Stay tuned!  A lot is happening in the last half of this month!

Read more...

  © Blogger template Webnolia by Ourblogtemplates.com 2009

Back to TOP