Powered by Blogger.

Deodorant Recipe #2

>> Tuesday, May 22, 2012

This particular recipe was inspired by this post at One Good Thing by Jillee.  Her natural deodorant was the basis for my experimentation.

Basically starting out I followed her recipe:

2-3 TBSP Coconut oil (melted in the microwave for a few seconds)
1/8 C Cornstarch
1/8 C Baking Soda
10 drops Tea Tree Oil

I soon found it to be a very runny consistency so I added another 1/8 C each of baking soda and cornstarch.

And I must admit that my tea tree oil is in a very large bottle and sort of dumped into my mixture, rather than dropped.  The lavender was drowned out completely by the tea tree smell.  Which is very much like a disinfectant odor, not an "I smell lovely" odor.  Hmm...

I tried that concoction for a few hours, but I found that it balled up under my armpits and kind of got all over everything.

I wondered what would happen if I added beeswax to make it solid.  So I did.  But then I got a bit carried away with experimenting.

What I recommend doing is this:
Mix these ingredients together:
   - 3 TBSP liquid coconut oil (remember to melt for a just a few seconds in the microwave)
   - 1/4 C + 2 rounded TBSP Cornstarch
   - 1/4 C + 1 rounded TBSP Baking Soda
   - 10 drops of Tea Tree Oil
   - A few drops of Lavender (or Vanilla or Sweet Orange)


In a double boiler, gently melt (DO NOT BOIL THE OIL): 
   - 3 rounded TBSP of Beeswax
   - 1 TBSP Coconut Oil

Add in the liquid-ish Baking Soda/Cornstarch concoction and stir until well mixed.  Dribble a bit in the bottom of clean deodorant containers (ones that have a base that can push up the deodorant) to seal the bottom.  Once that is cool, fill containers and let cool completely before capping.  You should have enough to fill two regular Secret sized deodorant containers, more or less.

And that my friends, is probably where I should have stopped.

But I didn't.  

Instead I did all of the above.  And then in a moment of sheer madness, I added the following:
- 1 & 1/2 TBSP Cocoa Butter

It took me about another hour or two to figure out what I had to add to even out the Cocoa Butter.

That meant I had to add:
- 1/2 TBSP Baking Soda
- 1 TBSP Cornstarch
- 1 & 1/2 TBSP Coconut Oil
- More Lavender
- 2+ TBSP Beeswax

And while I have really good deodorant in the sense that it can really block the smell of body odor the whole day and part of the next - a pretty big miracle in my book, the tea tree oil got toned down, and it blocks a lot of moisture, I really don't care for the smell overall.    

It's not bad because it's not uber strong or that noticeable, but tea tree oil and cocoa butter (that smells like chocolate, let me remind you) is not how I want to walk around town smelling.  In fact, while cocoa butter may be great for me, I can't get over the chocolate fragrance.  It drowns out a lot of other fragrances and does not mix well fragrance-wise with anything other than vanilla (or sweet orange if you feel like smelling like one of those orange chocolate balls that you buy at Christmas and smack on a table, breaking it into chocolate in the shape of orange slices).  I can't imagine wanting to smell like chocolate.  Ever.  Fruit? Love it.  Flowers? Ok.  Chocolate?  Never.

Thankfully it's subtle in the amounts I apply so *I don't think* I walk around smelling like disinfected chocolate, but I definitely am not going to repeat this recipe again with cocoa butter.

To remedy the smell situation, I did buy shea butter in solid form on Amazon.  I have no idea what it smells like or how it will affect the overall turn out of the recipe, but according to a lot of recipes I've seen for lotions and such, it's pretty interchangeable with cocoa butter.

In the meantime I am using what I made.  I really like that while it may not keep me perfectly dry in Florida heat and humidity (neither did prescription strength Secret or Dove, btw), it does keep me body-funk-odorless.  And I only have to apply it one time a day, although I did make a small travel size for my purse just in case.  If you apply to much, it will ball up under your arms, so just be aware of that.

What I really want to do next time is just try the recipe I concocted before I added the cocoa butter and see if that is enough.  I can always melt it all down again, add the shea and other ingredients, and see what happens.  But once you add something, there is no going back with that batch.

I hope soon to get to some makeup reviews that I've been dying to do now for a while.  I've discovered 3 new brands that are quite lovely.  I also made solid lotion bars that smell like orange chocolate, and would smell better as shea vanilla, I'm convinced.  Hopefully I'll get a chance to write about both of those topics soon.  Stay tuned!

Read more...

My Momma's Granola

When we lived in Africa, my mother always made granola for our breakfasts.  For much of my life I took it for granted and would look forward to having toast or pancakes, which were our special treat on Saturdays.  Occasionally we would buy some British variety of packaged cereals like corn flakes or rice crisps, but I preferred granola over those, even if we did have problems with infestations of weevils in our oats.

Now as a grown up, I miss my mom's granola.  There is no store bought brand that can live up to it, no matter how hard they try.  And now that I can't eat gluten, I don't bother to buy cereal except for splurging a couple of times a year on Fruity Pebbles, which happen to be gluten free.

Without further ado, here is my mom's pure, unadulterated best ever granola recipe:
1. Preheat oven to 250 degrees F
2. In a large mixing bowl, measure 10 cups of oats (I use Bob's Red Mill Gluten Free variety)
3. Add the following ingredients in a blender and blend until well mixed
    - 1/2 C water
    - 1 C oil (I use light olive but you can use whatever oil you want)
    - 1 C brown sugar
    - 2 tsp Vanilla
    - 1 to 1&1/2 tsp Salt

4. Pour the blended concoction over the oats and stir until thoroughly mixed.
5. Lightly grease two cookie sheets
6. Spread the oat mix over the two cookie sheets and bake for 1 hour
7. Don't forget to lick the bowl!!

I like to let the granola sit in the oven and let it all cool down together, after I retrieve a bowlful for myself to snack on.  That makes the granola drier and crunchier.

Once it's all cooled down, break it up and put it in an air tight container.  I don't know how long it stays good for because I always eat mine before it has a chance to go stale.

Variations:
I like to add flax seed, ground flax flour and pecans to mine.  For the one I make, I used only 8 cups of oats, and added 1/3 C flax seeds, 2/3 C flax flour, and 1 heaping C of chopped pecans.

You could try adding coconut, almonds, or other add-ins.  Just make sure to adjust the amount of oats up or down accordingly.

I wish I had pictures of my yummy batch of breakfast goodness, but alas, one camera has sand in it and I could not figure out where I had hidden the other one from Z.  

Read more...

Strawberry Freezer Jam Recipe

>> Tuesday, May 8, 2012

My poor neglected little blog.

I've decided I'm going to post my crafting, cooking, making, DIY stuff here, even if my projects aren't necessarily directly related to clean living.  Until I made that decision, I didn't know where to post my stuff, so I wasn't posting it.  That should increase my activity over here, too, so this blog isn't so badly ignored by me.

On to the recipe for strawberry freezer jam.

I used Ball RealFruit Instant Pectin and got the recipe from under the label.

Image courtesy of here

Recipe:
1 2/3 C prepared fruit
2/3 C sugar
2 TBSP Ball RealFruit Instant Pectin
(do not exceed more than 6 1/2-pint jars per recipe or jam won't set properly)

1.  Prepare the strawberries by washing & cutting off the tops (called "hulling"), and then slicing them.  Mash them one layer at a time using a potato masher.

FYI, don't bother dicing the strawberries.  If you make the pieces too small, you can't mash them very effectively with the potato masher.

I started with a little less than 4 lbs of strawberries.  Z had eat some for breakfast, and some had gone bad.  My strawberries were really, really ripe, and I thought that might affect the outcome, but it didn't.

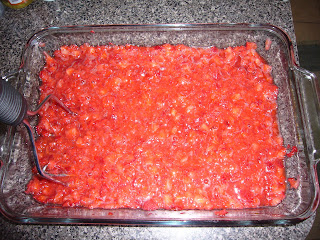
Here's my prepared fruit that I mashed up in a glass cake pan.  If you want smooth no-chunk jam, then I would recommend putting the fruit through a food processor, or something similar.  My strawberries, no matter how much I mashed them, stayed somewhat chunky. 


2. Mix sugar and pectin in a separate bowl.  

I measured my mashed strawberries and had enough to double the recipe.  Make sure you adjust the sugar and pectin up or down per the amount of prepared strawberries.

3.  Add fruit to the pectin/sugar mixture, and stir for 3 minutes.


 4. Ladle fruit mixture into clean jars and let stand for 30 minutes.  Make sure you leave 1/2 inch of headspace at the top of the jar so the jam has room to expand when freezing.

5.  Put lids on the jars, put a jar in the fridge for immediate consumption, and put the rest in the freezer.  Keep for up to one year in the freezer, or one month in the fridge.

My batch of 3 1/3 cups of jam made for 6 full half pint jars.  Remember this was a doubled recipe.


I can't believe how easy it was to make jam!  And so yummy, too!  My jam tasted like the fresh strawberries that are used in strawberry shortcake.  Delish!  I'm definitely going to try this with other fruit like blueberries.

Read more...

  © Blogger template Webnolia by Ourblogtemplates.com 2009

Back to TOP